Sharptop Visionary Garden| The Bottle Wall/Bench
A beautiful & functional way to hide the air conditioning unit.
Sharptop Visionary Garden Photo Galleries
 |
 |
 |
-
 The A/C UnitThere it is.....
the air conditioning unit
that needs to be hidden.
We're going to make a wall from recycled
bottles that will also serve as a bench. -
 The FooterWe need to pour a footer before
we could make the wall. It will
be the width of a wine bottle since
that's what we're making the wall from. -
 The GardenCheck out our garden!
The plants are filling in nicely.
The bottle wall will make a nice addition! -
 The Footer TrenchWe dug a trench roughly 4 inches deep
and the width of a wine bottle. It's almost
ready for cement! -
 Rebar and CementWe embedded rebar in the cement.
This will help add stability and strength
to the wall. Now it
will cure for two weeks before
we add the bottles. -
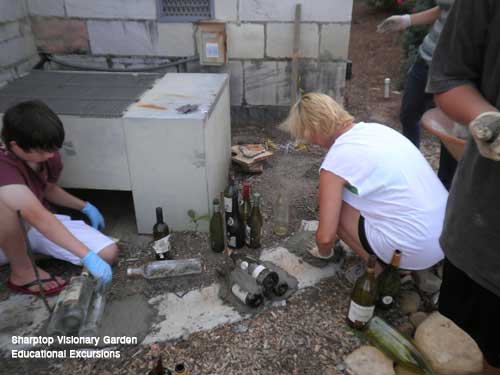
 We Begin the Bottles!We begin adding the bottles to form
the wall. They were recycled from a local restaurant.
If building a wall for a building that needs
insulative value, this is not the way you'd
build your wall. You'd make bottle bricks that
are sealed to hold air and allow light
to pass through. -
 The Wall Goes up!We secured the bottles with cement.
It's really easy ~ simply layer the cement and bottles,
making sure that everything stays tight. -
 The Wall's Almost Done!Check it out!
What a crew!
It's almost done! -
 The End ~ It was a Challenge!The end of the wall was a challenge.
We used vertical bottles to finish
the ends of the wall, but it was tough
to keep them in place.
It was worth it because
it looks great! -
 Almost done!Our team's putting on the vinishing touches.
It looks terrific!
We put stones on top to make a
smooth siting area. -
 Cleaning Up ~ Making the bottles shine!It's important to clean as you go.
It's really diffincult to clean chunks
of cement once its cured.
So clean the big pieces of cement
as you go. But you can scrub the bottoms with
some steel wool to once the cement's dried
make them shine! -
 Day One ~ We Got So Much Done!What a day! The wall's almost
done! The bucket is holding up the
botles at the end. -
 The Back Needs Some WorkOn day one, we focused
on setting all the bottles.
However, their necks were left exposed.
These could break off causing a
safelty hazzard. So tomorrow,
we'll fill in the back with cement. -
 The Back ~ End of Day 1The bottle necks look really neat.
It's unfortunate that they need to be covered.
But the extra cement will also add
lots of structural stability. -
 Filling the Back BeginsWe begin filling in the back with cement.
We've got to start at the bottom and
work our way up, packing cement between
the bottles as we go. -
 Oohhhh.... Pretty!Check it out!
We have a wall/bench!
And now the bottles are all shiny! -
 Drainage TunnelsWe installed tunnels every few
feet along the bottom of the wall. This will
enable water to flow through when it rains. -
 The End of the WallThe end of the wall turned out beautifully!
It was a challenge to set the vertical bottles, but
they worked wonderfully! -
 The Back ~ All Filled In!The back is all filled in!
We left the very end of some of the necks
popping through so folks could see
how we built the wall. -
 The Back of the Bottle WallAll done!
This wall is solid!
The bottle necks are protected
and all holes are filled! -
 The view from the backCheck it out!
The wall's done and is
lookin' good! -
 A Vast Improvement!Wow! What a difference!
The wall looks so much better
than the air conditioning unit.
And now there's a nice place for folks
to sit and enjoy the garden!